Preserve Your Garden's Bounty: The Art of Quick Pickled Crunchy Cauliflower
There's a special kind of satisfaction that comes from harvesting fresh produce, especially when your garden is overflowing with crisp, vibrant cauliflower. But with abundance often comes the question: how do you keep that freshness alive and prevent any precious florets from going to waste? Enter the humble yet utterly delightful world of quick pickling, offering an ingenious solution that's both incredibly easy and unbelievably rewarding. Forget tedious canning processes; we're diving into a simple refrigerator pickle recipe that delivers crunchy pickled cauliflower in a mere 24 hours, transforming your garden haul into a tangy, flavorful sensation.
This method of pickling is a game-changer for anyone looking to add bold, zesty flavor to their meals and snacks without the fuss. Imagine bright, crisp cauliflower florets, infused with aromatic dill and a balanced sweet-and-sour brine, ready to elevate everything from a simple sandwich to an elaborate charcuterie board. It's an explosion of taste and texture that will have you reaching for the jar again and again.
Why Quick Pickling is Your Garden's Best Friend (and Your Taste Buds Too!)
For many home gardeners, the seasonal bounty of vegetables is a joyful blessing, but also a race against time. Cauliflower, in particular, with its delicate texture and relatively short shelf life after harvest, often prompts a search for effective preservation methods. While traditional canning offers long-term pantry storage, quick pickling, or "refrigerator pickling," provides an immediate, low-effort alternative that retains the fresh crunch and vibrant flavor of your produce.
Unlike fermented pickles, quick pickles are made by submerging vegetables in a heated brine of vinegar, water, salt, and sugar, then refrigerating them. This process doesn't involve the complex fermentation that builds beneficial probiotics, but it excels in rapidly infusing flavor and extending freshness for a couple of weeks. The beauty of this method lies in its simplicity: no special equipment beyond jars and a saucepan, no extensive sterilization, and no hours spent hovering over a boiling water bath. The result is a vibrant, tangy, and incredibly crunchy pickled cauliflower that's ready to enjoy almost immediately. It's perfect for when you want to preserve flavor and texture without the long-term commitment of traditional canning, and ideal for using up a sudden influx of garden-fresh cauliflower.
The Magic Behind Perfectly Crunchy Pickled Cauliflower
Achieving that coveted crunch in your pickled cauliflower isn't just luck; it's a combination of fresh ingredients and a well-balanced brine. The acidity from the vinegar is key, as it not only preserves the cauliflower but also helps maintain its firm texture. Over time, even perfectly pickled vegetables can soften, which is why quick pickles are best enjoyed within two weeks for optimal crunch.
Essential Ingredients for Your Tangy Creation
The magic starts with high-quality ingredients. Here's what you'll need for this incredibly easy recipe, along with some insights:
- Cauliflower Florets: Aim for about 3 cups of bite-sized florets. Freshness is paramount here – the fresher your cauliflower, the crunchier your pickles will be. A general rule of thumb is that a one-pound trimmed cauliflower head yields about four cups of florets.
- Garlic: 3 cloves, minced, add a pungent, aromatic depth that complements the tangy brine beautifully.
- Mustard Seeds: 1 teaspoon. These tiny powerhouses contribute a subtle, peppery warmth and classic pickling flavor.
- Dill Seeds or Fresh Dill Sprigs: 1 teaspoon dill seeds or 2 fresh dill sprigs. Dill is a quintessential pickling herb, offering a fresh, slightly anisy note. Fresh dill provides a brighter flavor; seeds offer a more concentrated, earthy dill essence.
- Black Peppercorns: 1/2 teaspoon. For a gentle, underlying spice that enhances the overall profile.
- Water & Apple Cider Vinegar: 1 cup of each. This 1:1 ratio creates a wonderfully balanced brine. Apple cider vinegar, with its slightly fruity and mellow acidity, is often preferred for quick pickles over harsher white vinegar, contributing to a gentler, more palatable tang.
- Kosher or Sea Salt: 1 tablespoon. Using pickling salt, kosher salt, or sea salt is crucial. Avoid iodized table salt, as the anti-caking agents can make the brine cloudy and affect flavor.
- Sugar: 1 teaspoon. This is where personal preference comes in. While some recipes call for more, a small amount of sugar balances the acidity of the vinegar without making the pickles overtly sweet. If you prefer a sweet & sour crunchy pickled cauliflower, you might slightly increase this, but even a little sugar makes a big difference in creating a well-rounded flavor profile.
Feel free to experiment with other aromatics like red pepper flakes for heat, bay leaves for a subtle herbal note, or even a slice of fresh ginger for an unexpected twist. The options for customization are truly endless!
Step-by-Step Guide to Your Quick Pickled Cauliflower
- Prepare Your Cauliflower: Rinse your cauliflower head thoroughly. Chop it into small, bite-sized florets. The more uniform the size, the more evenly they will pickle.
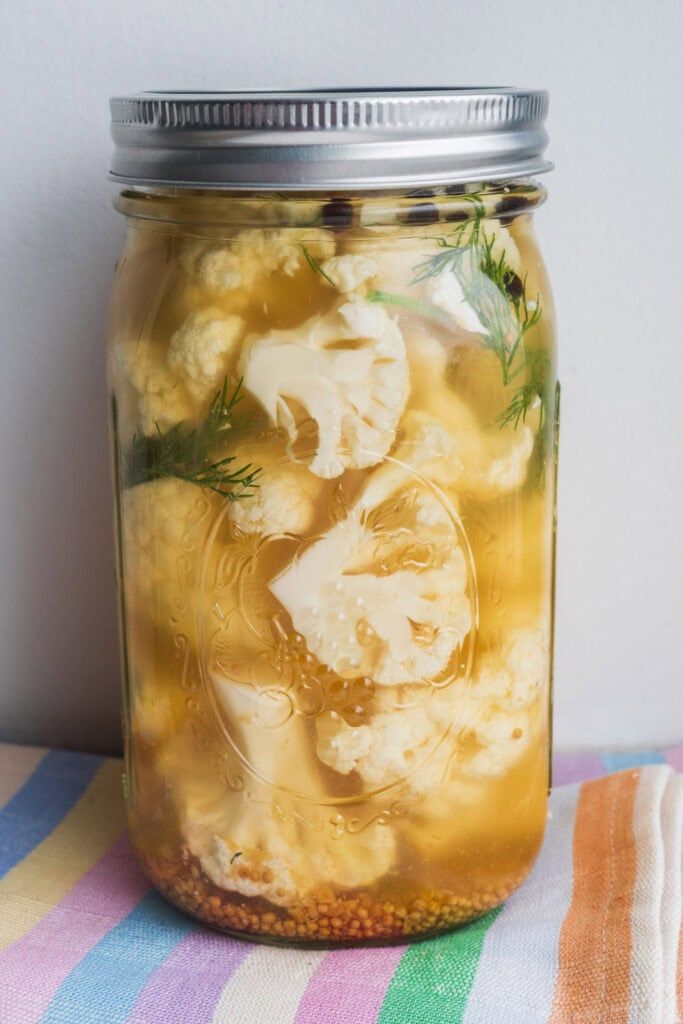
- Pack the Jar: Tightly pack the cauliflower florets into a clean quart-size mason jar. The tighter you pack them, the less air space there will be, and the more cauliflower you can pickle!
- Add Aromatics: Distribute the minced garlic, mustard seeds, dill (seeds or sprigs), and black peppercorns among the packed cauliflower florets in the jar.
- Craft the Brine: In a small saucepan, combine the water, apple cider vinegar, salt, and sugar. Warm the mixture over medium heat, stirring continuously until the salt and sugar are completely dissolved. There's no need to bring it to a rolling boil; just ensure everything is dissolved and the brine is warm.
- Pour and Cover: Carefully pour the warm brine over the cauliflower in the jar, making sure to completely submerge all the florets. If the brine doesn't quite cover them, add a tiny bit more water or vinegar (depending on your preference for tang) until they are fully submerged. This is critical for even pickling and preventing spoilage.
- Cool and Seal: Allow the jar to cool slightly on the counter. Once it's no longer piping hot, seal it tightly with a lid.
- Chill and Enjoy: Transfer the sealed jar to the refrigerator. While they'll be tasty after just 24 hours, the flavors truly meld and deepen after 2-3 days. For the absolute best crunch and flavor, consume your crunchy pickled cauliflower within two weeks.
Beyond the Jar: Creative Ways to Enjoy Your Pickled Cauliflower
Once you have a jar (or two!) of homemade crunchy pickled cauliflower chilling in your fridge, the possibilities for enjoying them are endless. These zesty florets are incredibly versatile:
- Snack Attack: Straight from the jar! They're a perfect guilt-free, tangy snack to satisfy a craving.
- Salad Superstar: Chop them up and toss them into green salads, grain bowls, or pasta salads for a vibrant burst of flavor and crunch.
- Sandwich & Wrap Enhancer: Add a layer of pickled cauliflower to your favorite sandwiches, burgers, or wraps for an unexpected tangy kick.
- Charcuterie Boards: They make an excellent addition to cheese boards and charcuterie platters, cutting through rich flavors and adding visual appeal.
- Taco & Fajita Topping: Offer them as a zesty topping for tacos, fajitas, or even loaded nachos.
- Side Dish: Serve alongside hearty fall and winter dishes, roasted meats, or grilled fish to brighten the plate.
- Egg Dishes: Finely chop and fold into omelets, scrambles, or serve as a side with deviled eggs.
Troubleshooting & Tips for Pickling Success
Making quick pickled cauliflower is forgiving, but a few pointers can ensure consistent success:
- Maintain the Crunch: The most common concern is losing that desirable crunch. Always start with very fresh, firm cauliflower. Ensure the florets are fully submerged in brine at all times during refrigeration. Exposure to air can lead to softening and potential spoilage.
- Flavor Evolution: Don't be discouraged if they taste a little mild after 24 hours. The flavors deepen and become more complex with each passing day. A few days in the fridge truly makes a difference.
- Storage: Always store your pickled cauliflower in a sealed jar in the refrigerator. While they are safe to eat for longer, for peak crunch and flavor, aim to consume them within two weeks. Beyond that, the texture might soften, and flavors might mellow too much.
- Customization is Key: Don't be afraid to adjust the sugar or spice levels to your taste. If you prefer less sweetness, reduce the sugar. If you love heat, add more red pepper flakes. This is *your* recipe!
- Cleanliness: While not as critical as traditional canning, using clean jars and utensils is always good practice to ensure the quality and safety of your refrigerator pickles.
Embracing the simplicity of quick pickling allows you to transform fresh cauliflower into a delectable, versatile condiment that will brighten any meal. It's a testament to how easy and rewarding preserving your garden's bounty can be, creating bold flavors and satisfying crunch with minimal effort. So, next time your garden yields a beautiful head of cauliflower, reach for this recipe and experience the joy of homemade crunchy pickled cauliflower – a truly delightful way to savor the harvest!
